
We Were Here Tomorrow G-46 15 Button Symbol Puzzle Solution (G-46B / G-46C, Temporal Research)
Updated 24 Oct 2026 · Game version: 1.1.1 · By the Indie Walkthrough crew
The answer in one line
Press four buttons on G-46C (rows counted from the top, columns from the left): row 1 button 3 (bar with two up arrows), row 1 button 4 (small diamond), row 2 button 2 (circle with a line through it) and row 3 button 3 (diamond on a stem). On G-46B, turn the dial so its pointer sits in the blue zone. The four lamps above G-46C light up when it is right.
The parts on G-46B matched the Russian guide in the one video we have, and the four buttons come from two Steam guides that agree. The video did not show which buttons were pressed, so a shuffle in other playthroughs is not ruled out. How to check it yourself is below.
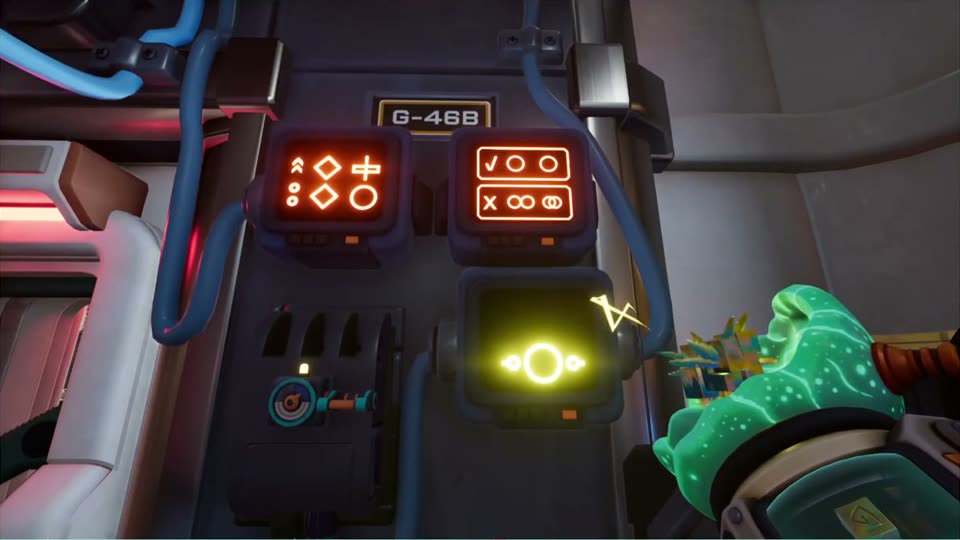
Where the puzzle is
Temporal Research Centre (TRC). The two halves of the puzzle are on separate panels labelled G-46B and G-46C, one for each explorer.
G-46B (the yellow explorer with the goop gun in our session): an orange screen with the parts of a symbol in two rows, an orange screen with a ✓ row and a ✗ row of circles, a yellow screen with a circle flanked by two small circles, and a dial with a pointer.
G-46C (the red explorer with the hook gun): 15 symbol screens in three rows of five, a red button under each, and four round lamps along the top.
Not sure you’re in the right place? Search for your room in Quick find tool.
What you need
- Walkie-talkie
Step by step
G-46B: read out the parts
Read the left orange screen row by row. In our session the top row was two small up-arrows (^^), a diamond and a cross-bar (a horizontal bar with a short vertical line); the bottom row was two small separate circles, a diamond and a big circle. The finished symbol has to contain every part on both rows.
G-46B: read the rule screen
The right orange screen has a ✓ row (two separate circles) and a ✗ row (circles that touch or overlap, like an 8 or interlocking rings). We read it as: separate circles are fine, joined circles are not. So the buttons with stacked or linked circles are wrong.
Inferred: pieced together from our sources, not shown step by step in a video
G-46B: set the dial to the blue zone
Below the screens there is a dial with grey, red and blue zones. The Russian Steam guide says to put the lever(s) in the blue zone. In our session the yellow screen showed the circle-with-two-small-circles piece standing on end before the dial was turned, and lying flat (as in the finished symbol) afterwards, so the dial seems to rotate that piece.
Inferred: pieced together from our sources, not shown step by step in a video
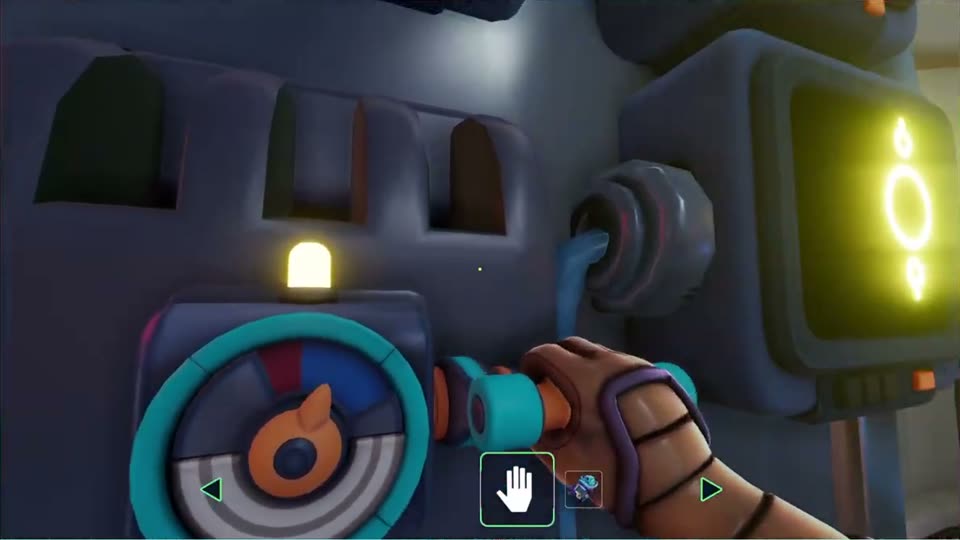
Frame from “We Were Here Tomorrow with @zer0Reviews (Part 2)” by Crystal Dreams. Watch at 2:09:45 G-46C: press the four buttons that build the symbol
For the top row of parts: row 1, button 3 (a flat bar with an up-arrow at each end) and row 1, button 4 (a small diamond with a short line). For the bottom row of parts: row 2, button 2 (a circle with a vertical line through it) and row 3, button 3 (a diamond hanging on a stem). The two small circles are already on G-46B's yellow piece, so no button is needed for them; this last point is our reading of the finished symbol.
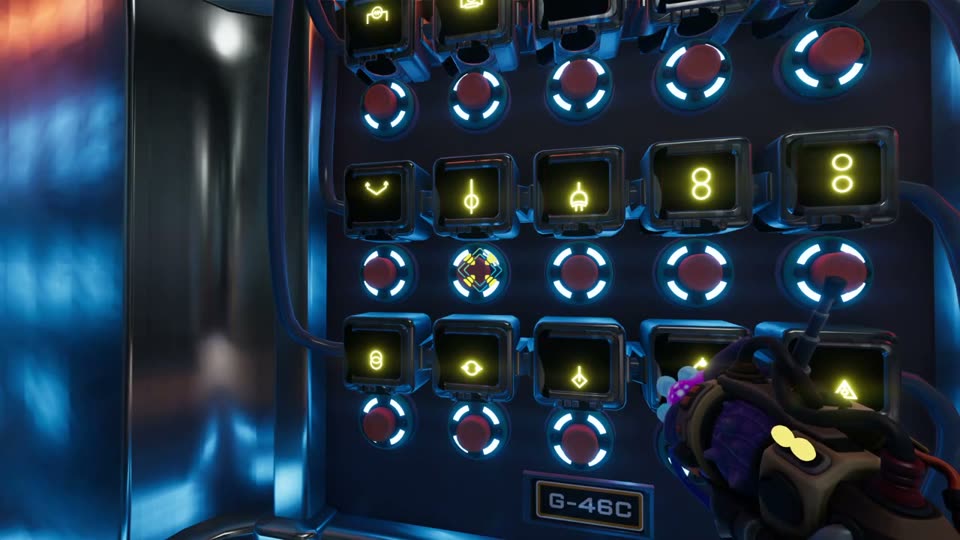
Frame from “We Were Here Tomorrow - Part 2” by Zero Reviews. Watch at 2:18:45 Check the lamps
When the symbol is complete, the four lamps on top of G-46C turn white. The combined symbol looks like a stick figure: two arrows up, a diamond on top, a big circle with a small circle on each side, and a diamond at the bottom.
This is the Temporal Research Centre symbol puzzle that people call “G-46” or “the 15 button puzzle”, after the labels on its two panels. It is not the 16-button symbol grid from the Assembly Line. One explorer stands at G-46B and sees what the symbol is made of; the other stands at G-46C and has the buttons. You build one new symbol together.
How to say it over the walkie: G-46C reads each candidate button’s symbol out loud (“row one, third: a bar with two arrows pointing up”). G-46B ticks off the parts it covers on the left screen. Stop when every part on both rows is covered and nothing extra is added.
If it doesn’t work
- Is this the same as the 4x4 symbol grid?
- No. The [symbol grid and dials puzzle](/we-were-here-tomorrow/puzzles/symbol-grid-and-dials/) in the Assembly Line has 16 buttons and one player describes four symbols to the other. G-46 has 15 buttons and you combine parts into one new symbol.
- Our left screen shows different parts.
- Then build from your parts instead: list every part on both rows, find the buttons that add up to exactly those parts, and skip any button with joined or overlapping circles. The parts matched in the video and both guides; the button answer comes from the two guides.
- Do we need a button for the two small circles?
- No. They are on G-46B's yellow screen already. Pressing the 8 or the stacked circles adds joined circles, which the ✗ row forbids.
- We pressed four buttons and nothing lit up.
- Check the G-46B dial is in the blue zone, then re-check each button against the parts list. A button you pressed by mistake may still be counted; we did not see how to clear a wrong press.
Sources
- We Were Here Tomorrow with @zer0Reviews (Part 2) by Crystal Dreams (G-46B side) Timestamps used: 2:09:45–2:16:00
- We Were Here Tomorrow - Part 2 by Zero Reviews (G-46C side) Timestamps used: 2:06:45–2:18:45 (lamps lit 2:18:45)
- Решение головоломки: составление символа из 15 кнопок G-46 (Steam guide) by Saint's Father
- An answer of Puzzle in Temporal Research (15button puzzle) (Steam guide) by 미팝
Spotted a step that’s wrong? Tell us and we’ll fix it and update the date.
indiewalkthrough isn’t affiliated with Total Mayhem Games.