
We Were Here Tomorrow Symbol Grid and Dials Puzzle Solution (Assembly Line 4x4 buttons)
Updated 24 Oct 2026 · Game version: Launch build (October 2026) · By the Indie Walkthrough crew
The answer in one line
Yellow reads the four symbols on the NORCEK panel one at a time; red finds each one on the 4x4 grid and presses it. A wrong press restarts with a new set. After the symbol rounds, set the three dials using the numbers the two sides trade. The symbols change every round and every playthrough, so there is no fixed button list.
In our session the sets included sun, Z with arrows, horned figure and circle-on-a-cross. How to describe the look-alikes is below.
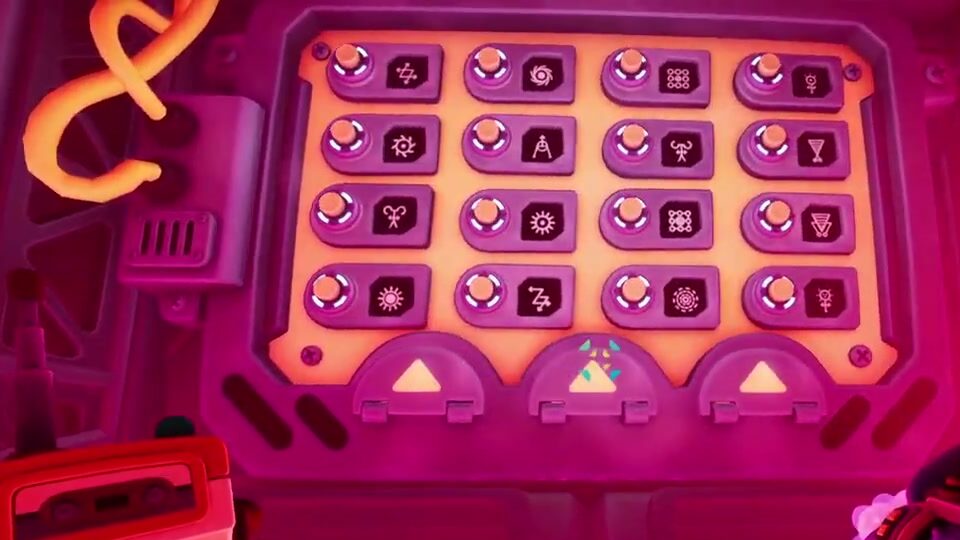
Where the puzzle is
The first room of the Assembly Line. Each explorer is in a separate chamber.
Yellow explorer (the goo-cube gun player in our session): a NORCEK INDUSTRIES panel showing four symbols in a row, plus a unit with three knobs, each ringed by five lights.
Red explorer (the pull-gun player): a 4x4 grid of 16 symbol buttons with three triangle buttons underneath, and below that three dials with the numbers 1 to 5 in a scrambled order.
Not sure you’re in the right place? Search for your room in Quick find tool.
What you need
- Walkie-talkie: only one of you can talk at a time, so take turns
Step by step
Yellow (four-symbol panel): read the first symbol
Describe only the first symbol, left to right. Give its outline, what is inside it and any count: spokes, dots, arms, horns and which way they point. Wait for red to confirm before moving on.
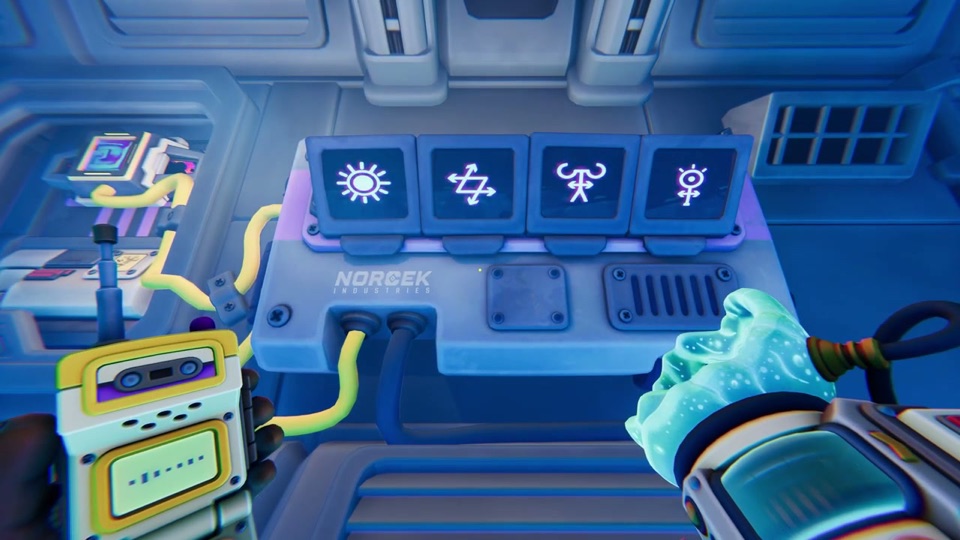
Frame from “WE WERE HERE TOMORROW Gameplay (PC 4K 60FPS) - No Commentary” by fgw. Watch at 1:22:28 Red (16-button grid): find it and press it
Scan the whole grid before pressing. Several symbols look alike (there are three sun-like shapes and two Z shapes), so read back what you see: "Sun with a dot in the middle, third row, second column?" Press only when yellow says yes. Press the buttons with the pull gun.
Repeat for all four symbols and confirm
Do the other three the same way. The three triangle buttons under the grid look like the confirm buttons; we could not tell from the videos whether you press them once at the end or between symbols.
Inferred: pieced together from our sources, not shown step by step in a video
Play the next round
Yellow's panel then shows a new set of four. Do the same again. If a press is wrong, the round starts over with a completely different set, so don't guess.
Inferred: pieced together from our sources, not shown step by step in a video
Both: set the three dials
After the symbol rounds, a dial unit wakes up on each side. Red has three dials with 1 to 5 in a scrambled order; yellow has three knobs ringed by five lights. Trade what you see one dial at a time ("left dial: my light is on the fourth position") and turn until the dial plays a happy sound. In our session the code was 4, 2, 3, heard on voice chat; it may differ in yours.
Inferred: pieced together from our sources, not shown step by step in a video
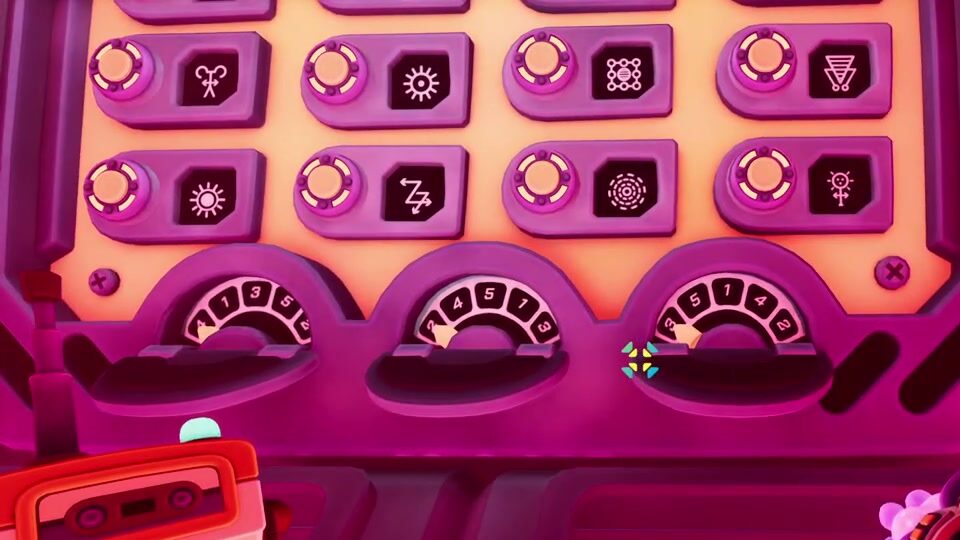
Frame from “The Puzzle Boys are BACK!!! Playing Co-op Puzzler” by Zedaph. Watch at 2:13:19
If it doesn’t work
- Is this the G-46 / 15 button puzzle?
- No. This is the 4x4, 16-button grid in the Assembly Line. The G-46 puzzle in the Temporal Research Centre has 15 buttons (G-46C) and a clue panel (G-46B) and works differently: see the [G-46 15 button symbol puzzle](/we-were-here-tomorrow/puzzles/g46-15-button-symbol-puzzle/).
- Can I just copy the buttons from this page?
- No. The 16 symbols on the grid stay the same, but the four shown to yellow change every round and every playthrough. In one playthrough the sets were: sun, Z with arrows, horned figure, circle on a cross; then funnel (upside-down triangle on a stem), circle on a cross, dotted circle, A-shaped lander. In the other playthrough the first set was spiral, Z, sun, 3x3 dots. Use the method, not a list.
- We keep pressing the wrong sun.
- There are three sun-like symbols on the grid: a spoked, gear-like one, a plain sun, and a small radiant sun. Yellow should say how big the centre is and whether the rays are thick spokes or thin lines.
- Which Z is it?
- The grid has two Z shapes. Say whether the Z has small arrowheads at its ends or a 7-like stroke through it.
- Horned figure or circle on a cross?
- The horned figure has curled horns and arms. The other is a ring sitting on top of a cross, like an ankh; one version has petals around it. Say which way the horns curl.
- Is the dial code always 4, 2, 3?
- We don't know. We heard 4, 2, 3 in one session and have no second recording of the dials. Read your own dials and trade the numbers.
- We talk over each other and nothing comes through.
- Only one walkie can transmit at a time. Let yellow finish a symbol, then red answers.
Sources
- WE WERE HERE TOMORROW Gameplay (PC 4K 60FPS) - No Commentary by fgw Timestamps used: 1:22:28–1:23:56
- We Were Here Tomorrow! AMAZING Co-op Puzzler with Zedaph! by Tango Tek Timestamps used: 2:04:01–2:10:44 (symbol sets 2:03:59, 2:07:44, 2:08:29; knobs 2:10:44)
- The Puzzle Boys are BACK!!! Playing Co-op Puzzler by Zedaph Timestamps used: 2:06:51–2:13:19 (grid 2:06:51, dials 2:13:19)
Spotted a step that’s wrong? Tell us and we’ll fix it and update the date.
indiewalkthrough isn’t affiliated with Total Mayhem Games.