
We Were Here Tomorrow Time Atrium Fuse Puzzle Solution (Temporal Research Centre, fuse configuration manual)
Updated 28 Oct 2026 · Game version: 1.1.1 · By the Indie Walkthrough crew
The answer in one line
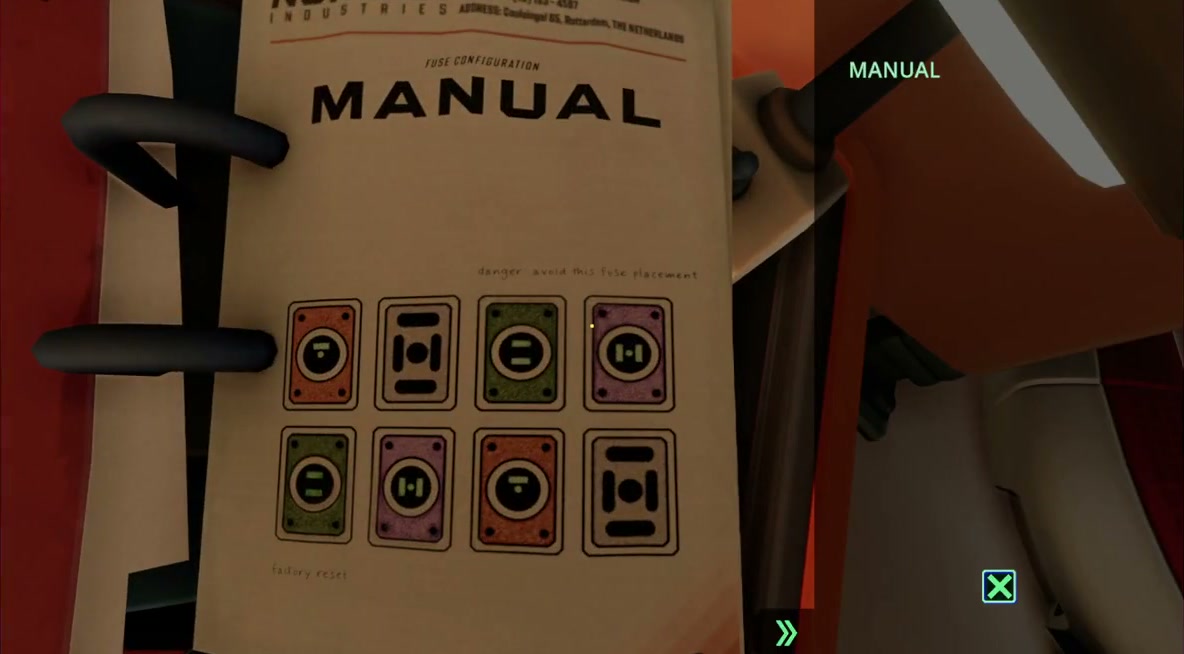
Copy the whole manual page onto the 8-slot fuse console, both rows. Top row: orange, empty, green, purple. Bottom row: green, purple, orange, empty. The console overloads with a bang, and the wall of lasers next to it opens. Then both of you touch the tips of the two crystals together to move on.
Yes, the top row is the one the manual labels "danger: avoid this fuse placement". Blowing the fuse box is the point. Each fuse has its colour and its own glyph, so match colour and glyph to the page. The layout matched in two separate teams' runs.
Where the puzzle is
Temporal Research Centre, the Time Atrium: the central hall with glowing blue time bubbles. It comes after the Control Room, where the voice says there is "too much temporal throughput" and you need a time crystal.
Touching a bubble together swaps the two of you between two eras of the same building. The fuse console is orange with 8 slots in two rows of four; a red laser wall stands next to it.
The fuses (also called plugs) are spread over both eras, so expect to carry some through a bubble.
Not sure you’re in the right place? Search for your room in Quick find tool.
What you need
- Fuses in three colours, orange, green and purple, each with its own glyph. Pick them up from the rooms around the atrium in both eras.
- The Fuse Configuration Manual, a page lying near the console. Either of you can read it.
Step by step
Collect the fuses from both eras
Gather the orange, green and purple fuses. Some are in the other era, so swap through a time bubble and bring them back; Darlom's pair carried plugs across this way (day 2, 2:13:34–2:16:08). The manual page has two of each colour across its two rows, so you need six fuses: two orange, two green, two purple.
Read the manual page
The Fuse Configuration Manual shows two rows of four. The top row is labelled "danger: avoid this fuse placement"; the bottom row is labelled "factory reset". Both rows go on the console.
Copy the page onto the console
Top row: orange, empty, green, purple. Bottom row: green, purple, orange, empty. Match the glyph on each fuse as well as the colour. Once the last fuse is in, the console blows up. That's the solution, not a mistake: the laser wall next to it opens.
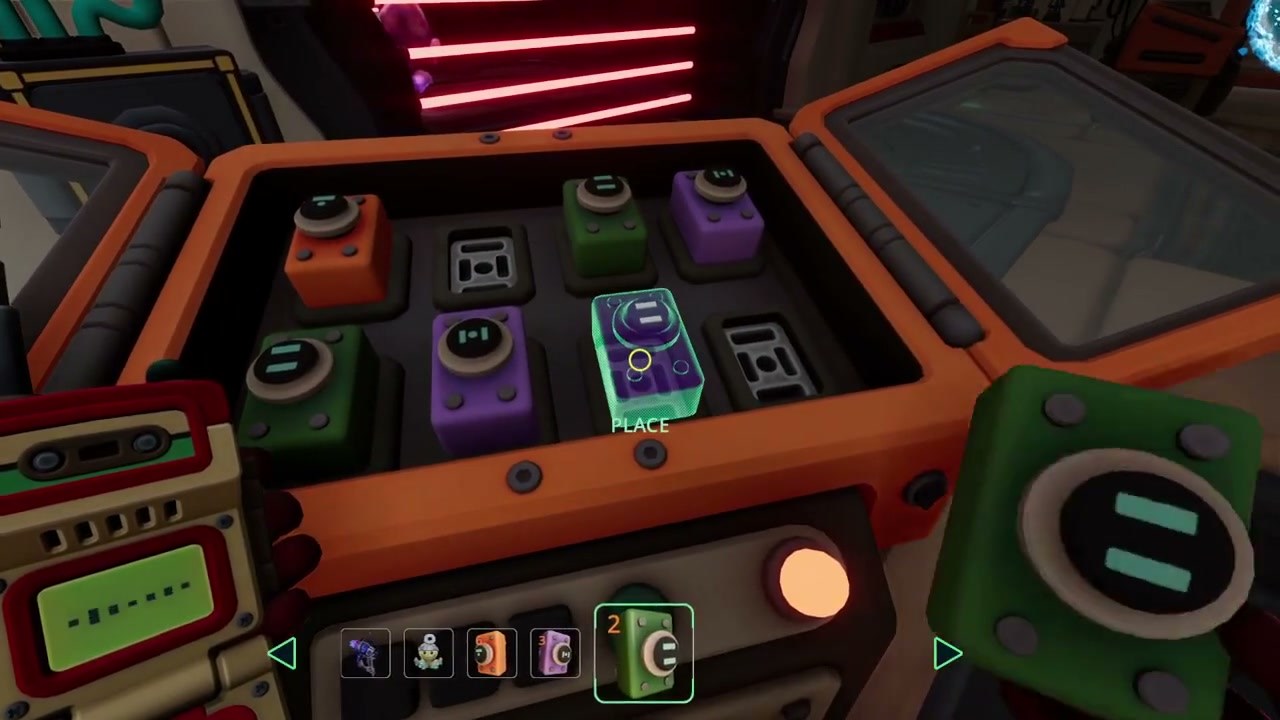
Frame from “We Were Here Tomorrow - Part 2” by Zero Reviews. Watch at 2:57:06 Touch the crystals together
Past the laser wall each of you can reach a crystal. Push them so the tips touch. That takes you on to the castle era and the orrery room. Next up is the time machine, which is missing a plant; that's the greenhouse plant puzzle.
Two teams fed this console on video. Darlom’s pair read the manual out loud and placed every slot, so their audio gives the exact order. The Crystal Dreams and Zero Reviews run shows the manual page and the console itself. The fuse colours on the page were the same in both runs.
If it doesn’t work
- Why would I place the row that says danger?
- Because that's what opens the way. One team placed the whole page, top row and bottom row, and the box exploded and the laser wall opened. A wrong fuse just sparks and the lasers stay up.
- The lasers are still there.
- Check every slot against the page: same colour and same glyph in the same position, and the empty slots left empty. In the frame above, a green fuse is about to go into the third bottom slot, which should be orange.
- I don't have enough fuses.
- The rest are in the other era. Touch a time bubble together to swap, pick them up there and swap back.
- What is the key card for?
- Not this. A voice line says her clearance was revoked, "thus rendering the card inoperable". One team carried it around the atrium for a while and never needed it here.
Sources
- We Were Here Tomorrow Can A Couple Solve All The Puzzles? (day 2) by Darlom Timestamps used: 2:13:34–2:16:08 (fuses carried between eras), 2:28:36 (key card revoked), 2:30:52–2:31:54 (reads the manual, places both rows, the box blows), 2:33:02 (laser wall opens), 2:43:10–2:43:16 (touch the crystal tips)
- We Were Here Tomorrow with @zer0Reviews (Part 2) by Crystal Dreams Timestamps used: 2:51:35 (the manual page)
- We Were Here Tomorrow - Part 2 by Zero Reviews Timestamps used: 2:29–2:59 (time bubbles and fuses), 2:50:20 (manual), 2:57:06 (console)
Spotted a step that’s wrong? Tell us and we’ll fix it and update the date.
indiewalkthrough isn’t affiliated with Total Mayhem Games.